Changing Tile Properties:
Accessing the tile properties are handled two ways, right clicking on a tile and choosing either "Properties" or "Quick Change". Clicking "Properties" will display a dialog box where you can assign the following properties.
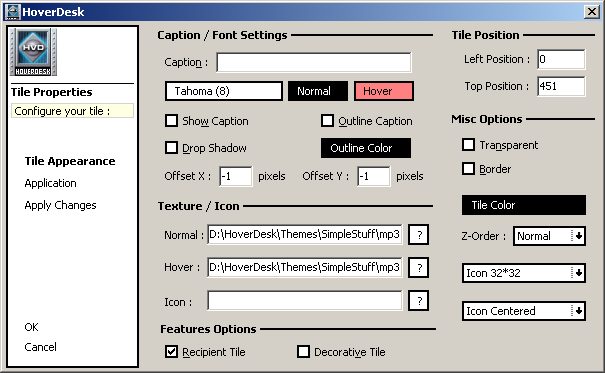
Tile Properties: (appearance dialog box)

Caption / Font Settings:
Caption: This is the text that will be displayed on the tile and for
tooltips if you choose to display either.
Font: Here, you may select the display font for the caption,
as well as the colors for both Normal and Hover states.
Show Caption: Enables caption display on the tile.
Drop Shadow: Enables drop shadow text effect for lables.
Outline Label: Enables outline text effect for lables.
Offset X / Y: Control the horizontal (X & Y axis) text offset in
pixels (-1 = centered)
Texture / Icon: You may browse for files to use for Normal and Hover state images. (The preferred method is to Drag'nDrop from an open Windows Explorer window) Use SHIFT+Drag to assign the Hover texture.
Hover Effects:
You may create special hover effect textures for tiles and assign them to the selected tiles by SHIFT+Dragging the hover texture onto the desired tile. Hover textures may be differently sized than the "non-hover" texture.
You may use animated .GIF files for Hover
Effect images.
NOTE: Tile labels will not be displayed on .GIF Hover Effects.
Icon: This is the location of the icon that will be displayed on
the tile. This can be stored anywhere on your system. You can also put ".xls" or ".doc" for
displaying the default excel/word icon (like for default apps).
NOTE: you can also assign an icon to a
tile by dragging any .ico file from an Explorer window onto a tile.
NOTE: If you are
intending to share your theme, you'll want to include all custom icons along with your
image files.
Tile Position:
You may use these coordinates (in screen pixels) to precicely place tiles and / or
create custom grouping effects. If this tile
is a parent one, then all child tiles will move according those values eg. You can move an
all group if you change the X,Y values of the Group tile.
Misc Options:
Transparent: Tile graphics must be pink (RGB: 255,0,255) where
transparency is desired.
Border: Enables or disables a one pixel highlight/shadow
border surrounding tiles. Tip: Use a border when not using custom images
for a more finished look.
Tile Color: If you're creating a theme and do not wish to create or use
custom images, you can select the tile's background color using a standard Windows color
picker.
Z-Order:Select the desired Z-order value from the drop-down menu.
Icon size: Select the size of the icon to be diplayed
on the tile.
Icon Placement: Determines the icon placement in relation to the
tiles' label.
Tile Color: If you're creating a theme and do not wish to create or use
custom images, you can select the tile's background color using a standard Windows color
picker.
Feature Options:
Recipient Tiles: Now you can set your tiles as Recipient ones. To
do so, just right-click on a tile and choose "Recipient" When a tile is set as a
recipient:
a) The Tile is opening a folder (eg. Application Path = folder/drive
path)
If you drop ANY files on that tile (even the .BMP ones) then they will be COPIED into the
folder (Application Path).
If you're holding the SHIFT key while dropping files on the tile, then those files will be
MOVED into that folder.
b) The Tile is an application (Application Path = exe name or full
path+exe name or .EXT)
If you drop ANY files on that tile, then HvD will launch the Application (regarding the
Application Path) and open the files dropped with that application.
Example 1: your default BMP editor (Windows setting) is PainShop. If
you're creating a tile with .PSD (or photoshop.exe full path) in the application path,
then any image files dropped on that tile will be opened by Photoshop.
Example 2: If your tile application path is .TXT, then any dropped files on
that tile will launch your default text editor to open those files (useful for text files
which don't have a .TXT extension)
Decorative Tiles: You can create special tiles that are decorative in nature and can serve as a base image for other HVD tiles.
To create a decorative tile: create your custom bitmap, make a new tile and assign the Decorative Tile application type. Then you can change the Order to Bottom. Any tiles or groups you place on top of this decorative tile can be associated with it. Right click the group or tile and select Associate. This attaches the group or tile to the image below it. Now if you move the decorative tile, all tiles and groups associated with it will move too!
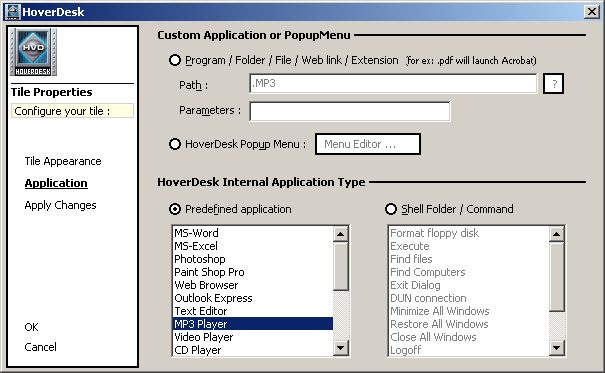
Tile Properties: (application settings dialog box)

Custom Application or Popup
Menu:
Program / Folder / File...: The path to the .exe file or just an application extension (for ex :
.doc) with Program in Application Type you wish to
launch.
NOTE: An application also may be
assigned to a tile by dragging any .exe file from an Explorer window onto a tile.
NOTE: An application also may be assigned to a tile by CTRL + dragging any .exe
file from an Explorer window onto a tile. This preserves the existing icon that may already be assigned, or prevents
an icon from being assigned to a tile that does not have one assigned.
NOTE: This may also be a file you wish to open or a URL you wish to
view.
Parameters: You may specify any standard Windows Run parameters here
HoverDesk Popup Menu: Assigns this tile as a a popup menu launcher. You may edit the contents of the menu using the menu editor.
HoverDesk Internal Application
Type:
Predefined Application: You can choose from this menu any one of the default
program types. This will launch the default application you have associated with those
file types.
Example: You might have Internet
Explorer set up as your default web browser. By choosing the web browser default type, you
do not need to specify a path. This is handy for themes you wish to share. The user
doesn't need to specify a path either, even if they are using Netscape or a different
default browser.
Shell Folder / Command: You can select any one
of the available system commands to be activated upon tile click.
NOTE: The Application Type list is expandable : Users can add their own application types in the file HvDAppExt.ini (please read carefully the comments inside this file). All application types inside this file will appear in the Predefined App list (Application Settings tab)
Quick Change options:

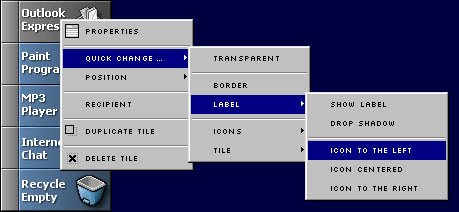
By selecting the "Quick Change" menu (right click on a tile, and select "Quick Change") you can check or uncheck these options:
Transparent: If your custom tile graphic includes transparent areas (RGB
255,0,255), this option enables or disables transparency.
TIP: disabling
transparency, if not needed, increases display performance.
Border: Enables or disables a one pixel highlight/shadow border
surrounding tiles.
Tip:
Use a border when not using custom images for a more finished look.
Label: Displays an additional menu that allows you to enable or disable the caption display and choose an icon/text layout preference.
Icons: Displays an aditional menu that allows you to choose the
default program icon (instead of a custom one) and select the icon display size.
NOTE:
Icons that are not created in larger sizes will be stretched to the chosen display size,
and may result in a less attractive appearance.
Tile: Displays an additional menu that allows you to clear the icon from the tile, clear the texture, and adjust the tile display size.
Additional Options:

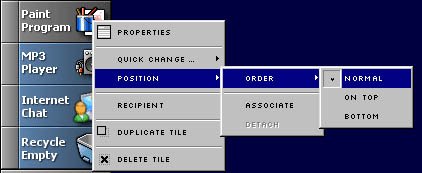
Position: You can specify the "Z-Order" of a tile. Specify Normal, (just like any other tile), On Top, (always on top), or Bottom, (just above the wallpaper).
Z-ORDER: You can also create tiles that provide desktop elements such as borders or "holder" items for docks. Create a tile of any size and right click on it. Select Order and choose from Bottom (just above your wallpaper), Normal or Top (always on top)
Associate: Used to "attach" a tile or group to a Decorative Tile. (read more about decorative tiles)
Detach: Used to detach a previously associated tile or group from a
Decorative Tile. (read more about decorative
tiles)
Duplicate Tile: Creates a copy of the selected tile.
Delete Tile: Deletes the selected tile.